Step by step procedure of how to move MSSQL Server Express App_Data files to SQL Server 2008 R2.
Current environment settings are MSSQL Server Express and SQL Server 2008 R2.
This particular move process is done on the MVC Music app sample from Microsoft, but it works the same way on any Web application.
Some Hints:
- Make sure that Application is not open VS2010 in my case – no handles on the files to be moved.
- One database has to two files ( MDF and LDF).
Start here:
- Go to Application folder i.e. my case is D:\Projects\MvcMusicStore\App_Data and find the files to be transferred like the ones bellow:

- Next step is to go to the target folder where SQL 2008R2 stores data base files.
- Open SQL Server Management Studio. Download it from here if you don’t have it installed.
- Connect to the target server with the appropriate username and password, preferably the sa password.
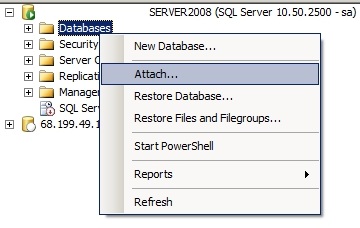
- Right click Database folder and select Attach…

- On the next pop up window by selecting Add.

- The Location of Database files is specified on the picture bellow. In my case : C:\Program Files\Microsoft SQL Server\MSSQL10_50.DEEQLSERVER2008\MSSQL\DATA
- Press Cancel.
- At this point stop the service of the 2 instances MSSQL server 2008 R2 and MSSQL Server Express.
- Copy the files from App_Data and paste them into:
- C:\Program Files\Microsoft SQL Server\MSSQL10_50.DEEQLSERVER2008\MSSQL\DATA .
- Right click Database folder and select Attach…
- Click on the MDF file name to be attached.
- When the attachment process is done Click OK.
- The name of the attached database is the file path, rename to a better one.
First part is done. Now we have to change to web.config file.
Note Line 4 and 5.
<connectionStrings>
<add name="ApplicationServices"
connectionString="data source=.\SQLEXPRESS;
Integrated Security=SSPI;
AttachDBFilename=|DataDirectory|aspnetdb.mdf;
User Instance=true" providerName="System.Data.SqlClient" />
<add name="WebStoreEntities"
connectionString="metadata=res://*/WebStoreEntities.csdl|res://*/WebStoreEntities.ssdl|res://*/WebStoreEntities.msl;
provider=System.Data.SqlClient;
provider connection string="
Data Source=.\SQLEXPRESS;
AttachDbFilename=|DataDirectory|\MVCMusicStore.mdf;
Integrated Security=True;
User Instance=True;
MultipleActiveResultSets=True""
providerName="System.Data.EntityClient" />
</connectionStrings>
Below the new connection string. Pay attention at line 4, 5, 7, 8, 9, 10.
<connectionStrings>
    <add name="ApplicationServices" connectionString="data source=.\MYSQLSERVER2008;
         Initial Catalog=aspnetdb;
         User ID=myUserName;
         Password=myPassword;"
         providerName="System.Data.SqlClient" />
    <add name="MusicStoreEntities" connectionString="data source=.\MYSQLSERVER2008;
         initial catalog=Mvc3Music;
         User ID=myUserName;
         Password=myPassword;"
         providerName="System.Data.SqlClient" />
</connectionStrings>
end:
Also, make sure that <system.web> node has the following:
<authentication mode="Forms">
      <forms loginUrl="~/Account/LogOn" timeout="2880" />
</authentication>

<membership>
	<providers>
  	<clear />
	    <add name="AspNetSqlMembershipProvider"
	    type="System.Web.Security.SqlMembershipProvider"
	    connectionStringName="ApplicationServices"
	    enablePasswordRetrieval="false"
	    enablePasswordReset="true"
	    requiresQuestionAndAnswer="false"
	    requiresUniqueEmail="false"
	    maxInvalidPasswordAttempts="5"
	    minRequiredPasswordLength="6"
	    minRequiredNonalphanumericCharacters="0"
	    passwordAttemptWindow="10"
	    applicationName="/" />
	</providers>
</membership>

<profile>
	<providers>
  	<clear />
    <add name="AspNetSqlProfileProvider"
    type="System.Web.Profile.SqlProfileProvider"
    connectionStringName="ApplicationServices"
    applicationName="/" />
	</providers>
</profile>

<roleManager enabled="true">
	<providers>
  	<clear />
    <add connectionStringName="ApplicationServices"
    	applicationName="/"
     	name="AspNetSqlRoleProvider"
      type="System.Web.Security.SqlRoleProvider" />
      <add applicationName="/"
      name="AspNetWindowsTokenRoleProvider"
      type="System.Web.Security.WindowsTokenRoleProvider" />
  </providers>
</roleManager>
End

no comment until now